Wednesday, July 15, 2020

Wear a Mask

The family's favorite mas is the octagon/3D/origami mask. I thought I'd share how I make it. Please note- I am a lazy seamstress and cut corners where I can. I don't iron if I don't have to, I pin less than most people, and I rarely baste. If you want to iron/pin/baste more than I do, please help yourself.

First, the pattern. Open and print at 100% the pattern below. It has brief instructions on it as well. The 1 inch square should measure 1 inch. If it's bigger, your mask will be bigger. If it's smaller, your mask will be smaller. Whether that's good or bad depends on your face, I guess.


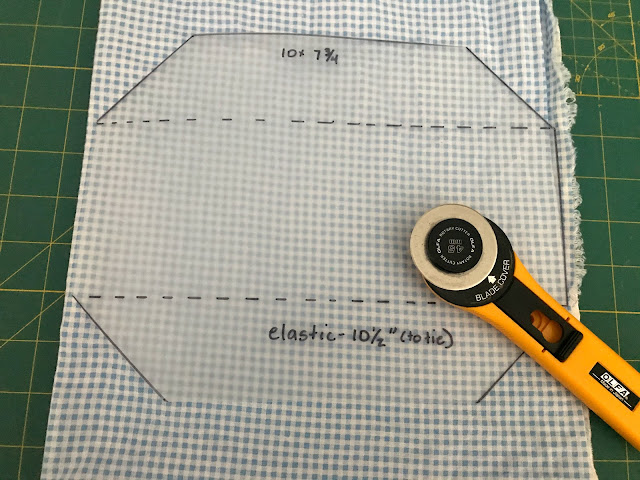
You are going to need to cut out one inner and one outer with the same pattern. You can use the same fabric, but some people prefer different fabrics just to make it easy to tell which side of the mask is out and which one is in.


I have transferred the pattern to a plastic sheet so that it's more durable. I use a rotary cutter and generally cut 4 pieces at a time.

After your pieces are cut, put the outer and inner layers right sides together. You're going to be stitching all of the way around, leaving a 3-4 inch gap on the long side on the bottom.


 After sewing around, trim the corners and turn right side out. Poke corners to get them nice and crisp. You can iron, if you'd like. Make sure the fabric in the gap turns under so that when you topstitch, it looks just like the top side.


Topstitch on the long edge on the top and bottom approximately 1/8" from the edge. This will close up the gap you left for turning.

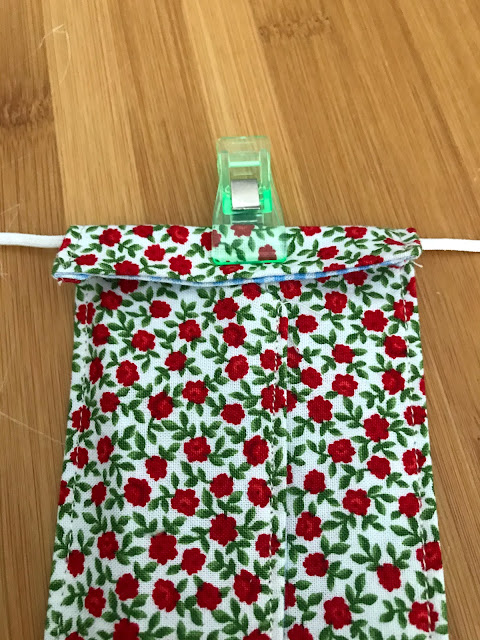
Fold the top down and the bottom up towards the center of the mask. Clip in place. Topstitch approximately 1/8 inch from the edge. This will help give the mask shape and structure.


Here's the trickiest part of the mask. You're going to be forming the channels for the elastic and folding the nose and chin panels to help give the mask it's 3D shape.

Cut the elastic to your desired length. I use 10 1/2 inches. My daughter likes it shorter, my husband likes it longer. Put the elastic about 1/2 inch from the end of the mask and fold over. Clip it in place. Keep the elastic as close to the fold as you can. This will keep you from sewing over it (hopefully). Repeat on the other side.


Fold the chin side down so that the angled part is parallel to the elastic channel. It should go right UNDER the elastic channel. It will pull up part of the mask. That's ok and what you want it to do. Pin in place. Repeat for the other 3 corners. Sew as close to the edge of the elastic channel as possible, but making sure you catch the edge of the chin or nose folds, backstitching at the beginning and end.


 Trim all the threads. Tie the elastic with and overhand knot and pull it into the elastic channel. You are ready to go!


Monday, July 25, 2016

Drawstring/Zipper Pouch


I’ll be the first to say it. I’m a lazy seamstress. I hate pressing, I often cut crooked. My seams aren’t always a perfect 1/4 or 5/8 inch. I just want to make stuff and have it come out cool. Having said that, here’s my tutorial on a drawstring and zipper pouch made from a combination of repurposed jeans and quilting cotton. If you can forgive me for cutting corners, I'll let you press and be as meticulous as you'd like.

Supplies:
Jeans
Main body- 18 x 12 inches
Quilting cotton
Zipper pocket- 15 1/2 x 7 inches
Lining- 18 x 12 inches
Drawstring casing (2)- 9 x 2 1/2
Notions
Thread
Zipper- 5+ inches (extra can be cut off)
1 yard or cording or ribbon

Process:
To put in the zipper pocket, we’re going to create a welt pocket, then sew in a zipper, and stitch up the fabric to create the pocket. If you’ve never made a welt pocket before, you might want to try it first on another piece of fabric…or at least look up complete directions. It’s kind of like a magic trick.

Lay the denim right side up. Lay the zipper pocket fabric right side down on the top left half of your denim. With a pencil, draw in a 4 3/4 x 3/4-inch rectangle about 2-3 inches from the top of your fabric. Using your sewing machine, stitch around this rectangle. Cut a line down the center on the rectangle and create reverse arrows at each end. Be careful to cut all the way to the corners, but DO NOT cut the thread. 

Now the magic happens. Shove all of the lining fabric through the opening you just cut. Pull it straight in the back until a clean open rectangle appears in the denim.


Pin your zipper behind the opening. Topstitch around the rectangle with denim side up, taking care to put the slider in the rectangle opening and NOT breaking your needle on the zipper stops. You may want to use a zipper foot, but a regular foot works just fine, too. Cut off excess zipper.

To create the body of the pocket, fold the lining fabric up so that the top edges match up (right sides together). Sew both sides. The top will be sewn in with the casing/lining sandwich.

So far, so good? Excellent.

Take the drawstring casings. Hem each side with a 1/8 to 1/4 hem. I just do a single fold so the cord slides more easily. Fold in half, wrong sides together. If you’re an ironer, go ahead and iron them folded in half. Find the middle of your denim piece on the long side and pin the casings in place at the top with a 1/4 inch gap at the middle with raw edges up. There should be enough room on the ends for a seam. Add to the top your lining fabric, right side down. Sew along this top edge.

Lift up the lining fabric. If you’re still ironing, press the seams open. Fold in half with right sides together, meeting the lining to the lining and denim to denim, matching the seam. Stitch. 


Here’s another slightly tricky part. Lay your bag flat, with the lining at the top and the denim at the bottom. Cut out 1 1/2 inch squares at each corner. You’re creating boxed corners. On the denim side, sew across the bottom. Open up the boxed corner, match seam to seam, and stitch. Repeat for other corner. On the lining side, sew about 1 inch on each side of the bottom, leaving the center open to turn the bag. Box the corners just like the denim side.


Turn bag right side out through bottom of lining side. Tuck lining inside the bag. Stitch opening shut.

Add cording through casing. Put one cord through clockwise, the other counterclockwise, each ending on opposite sides of the bag. Knot securely. You’re finished!

Sunday, July 10, 2016

Universal Studios Hollywood Shows

Although Universal Studios Hollywood is probably best known for their tram lot tour followed by their rides, they also are currently offering 3 shows- Special Effects, Pet Actors, and Water World. We have now attended all three shows...some of them more than once.

Special Effects is a show that was housed in a theater that I remember seeing Conan the Barbarian in as a kid. Like all of the shows, you're sitting on an aluminum bench with someone knees in your back and your knees in someone else's back. The shows are about 20 minutes long, so not a huge problem. I'm just grateful they're not changing airline seats to Universal's seating charts. The Special Effects show takes you behind the scenes for the history and process of Hollywood's special effects including sound effects, green screen, fire, and fake equipment. They use audience members as part of their show, selected (I think) as people are entering the theater.

Pet Actors is cute. It's a show that you can see at most amusement parks with this kind of show- animals come out and do tricks with and without their trainers. Birds fly over your head to and from their trainers or boxes along the back wall. Still, you get to sit down in semi shade for about 20 minutes. The animals in the show come out on stage to meet the audience after the show.

Water World is a stunt show. A water stunt show. With big effects. (When they work.) It has a huge stadium for seating. There's a cue to line up before the show that is misted and mostly is partial shade. It looks like it holds a bazillion people. They will all fit in the stadium and there really isn't a bad seat in the house. Boats and jet skis are driven around the watery stage. Bad guy tries to conquer the world and get the girl. Lots of fake shooting and fire. You can guess the ending. It was a pretty bad movie, but a pretty good show. Unfortunately, the props seem to be a little persnickity, so every show is different. Water warning- you may get wet, especially if you sit in the soak zone. The preshow actors seem to like throwing water around.

So there's the show low-down. No one (as far as I know) goes the Universal Studios for the show, but they're a nice break during the day. Note: none of the theaters has a restroom, so go before you sit down.

Extra tip: Universal sells a refillable bucket of popcorn for $6. I highly recommend it if you're going to watch the shows, but fill it before you go in to each one. They don't sell drinks and snacks in the theaters.

Friday, July 8, 2016

Hogsmead

We've made a few visits to Universal Studios Hollywood in the past few months to visit Hogwarts and Hogsmead. Here are some notes for anyone wanting to visit...

The first thing the kids wanted to do was visit Ollivander's wand choosing ceremony. So we got there first thing, waited 30 minutes, and were ushered into a tiny room with some cool effects where a wand choose someone from another family. They haven't wanted to do that again and I'm grateful. It was cool to see once, but I don't think seeing it again is worth the wait. We've seen wait times of up to 90 minutes during our visits.

After the wand choosing ceremony, you (surprise) exit through the wand store. They have character wands and wooden wands. Some of them are interactive (with a gold label on them) and will create animations in some of the windows around town (look for bronze medallions in the street, you'll also get a map with the wand). My kids each picked on out and have brought it back for each of our trips. They're expensive, but the kids really love them. I have heard that you need to be careful not to scratch the tip or it'll stop working.


If you are able to skip the wand choosing ceremony, but would still like to purchase a wand, you have several option. The first is to simply go into Ollivander's. Sometimes there's a line just to get in the store, but they have the most information on each of the wands. Next is a wand cart at the back of Wizarding World, between the two rides. I've also seen them in the Harry Potter store on the lower lot and in the big store, in the Harry Potter section near the park's entrance.

Looking back, it would have been a better idea to visit Ollivander's, find the wands they wanted, ridden the rides (where you can't take anything on), and then purchased the wands at the cart show in the picture above. When you buy the wand it comes in a box and a handle bag. Beautiful presentation, but cumbersome to carry on rides.

Next on the list was butterbeer.
Butterbeer comes in cold and frozen. It also comes in a regular cup and in a souvenir stein. Cold and frozen are approximately the same price- $5. Our family is split down the middle with preference. The girls prefer cold, the boys prefer frozen. There are two places to buy this wizarding drink- near the front of Wizarding World and near the Three Broomsticks. Take a peek at both of them if lines are long at the first one you visit. Sometimes one has a long line, but the other one has no line at all.

While you're there, visit the bathroom. Tell Myrtle I said hello.

Saturday, June 27, 2015

Peasant Blouse

It's been hot lately. I've adapted to my beach environment and go melty when it's in the 80s...and heaven forbid, 90s. I love sewing, but I don't often sew clothes for myself- that would involve measuring and fitting. I prefer Halloween costumes for the kids. Like I've said it's been hot. And I printed out the pattern for MellySew's peasant blouse over a year ago. Then I found some great voile flowered fabric at my local fabric store (cheap!).

So, I taped together the pattern. And cut out the pieces. And was disappointed that the back and the front were on top of each other (but it was a free pattern, so I got over it). Then, I realized that there were no sizes on the pattern. Hmmm. I usually wear an XL and I'm taller than the average bear. Things that say one size don't always fit me. I check the blog and there's no size, but it warns that since it's free you get the size that fits the writer. Ok.

Turns out I have a blouse that's a similar style. I measure the blouse and measure the pattern. The pattern is much smaller than my blouse. Good to know before cutting the pattern. I added 2 inches to the middle of the blouse where the fold line is, cut the sleeves down the middle and added 2 inches, and added about 3 inches to the bottom of the pattern (see tall above, no one wants to flash their belly button on accident).

Got it cut out and sewn. Make an elastic casing and threaded 1/8 inch elastic around the top. Went to try it on. It cut into my arm pits. Badly. Oops. I'd added to the width of the blouse, but not the depth in the arm area. The good news is that this takes away fabric rather than adding it, so I could fix my new blouse. I cut the bottom curve of the arm deeper on both the sleeve and shirt, then sewed that area back up. Much better!

After wearing this blouse for a  time or two, I feel like I'm channeling my mother in law. She had a very similar blouse she used to wear in hot weather, but I didn't really remember that until I had made my own.

I recently wore this top on a trip to an amusement park. It was nice and cool, but I forgot to put sunscreen on my neck and inside shoulders...because they're usually covered with a t-shirt. Oops. The neckline also got pulled around with my backpack. I'm not sure I'd wear it to an amusement park again, but it'll be great for almost anywhere else.


Tuesday, June 2, 2015

Line as Design

I'm currently thinking about concepts to pull together a portfolio to use for the 2016 Art CSET. My first thoughts go to line- line as texture, line as shading, line to show movement. Stay tuned for examples?

Friday, March 28, 2014

Quick and Easy Cut Apart Cards

So I was cruising Pinterest the other day and found this great blog post about cutting 3 sheets of paper into pieces to make 4 cards. I decided to try it. Unfortunately, with all of life's happenings going in it's taken me 2 days to make these cards, but here they are.

I actually ended up cutting 6 pieces of paper to make my stack of card parts- brown, blue, peach, pink, and 2 sheets of white. I used the top part as card bases rather than card fronts.

Review:
It was quick, it was easy and I'm not done with all of the pieces yet. I found the smaller pieces a little awkward, especially in darker colors, so I didn't use them all quite like the sketch, but I love the matted saying and the paper ribbon. I added some dry embossing in a few places and called it done.

I think this would make a great gift for a want-to-be crafter- cut a stack of cardstock and bases, add in a few stamps, and some adhesive and someone can make a whole stack of cards to give away.